The Inventory product table is where all SKU(s) that are physically received and or stored in the warehouse are created. This table has a relationship with the “Inventory Summary “from WMS, the “Channel Product” from MMS, the “Ship Station and Bulk Order” from SMS. The main page looks like what you see below:

-
– Map Warehouse: Since each product is mapped to a specific warehouse, check the product to want to auto map multiple products to a warehouse.
-
– Export: This will export the products you check and properties into excel
-
Import: You can use this to add new items or update the content of existing items. If you want to see and update the existing data, be sure to click on the “Include Existing SKU’s” before downloading the template. Note that any changes made to the exported data and loaded back into the system will update the info for that record. Therefore, if you just want to add new items, do not check that box when you download the template.
-
 This will allow you edit the properties or view the product.
-
 This will delete the product
-
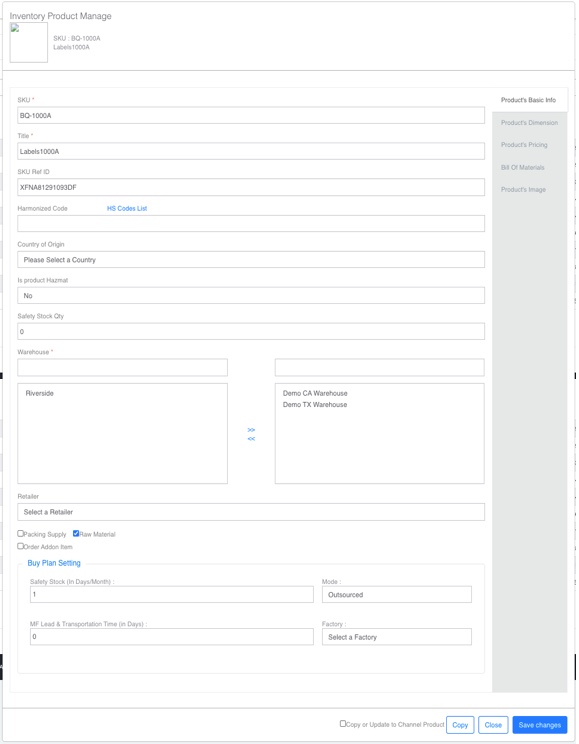
 This will open a new window for you to create a new product as showed below:

-
– SKU: This is what identifies the item, it cannot be duplicate
-
– Title: This is the title of your product
-
– SKU Ref ID: If the SKU above is NOT on your actual product then use this bucket to enter the alternative SKU you have on your product. It cannot be duplicate
-
– Harmonized Code: This is is NOT required unless you are shipping your international orders using “Borderguru”
-
– Country of Origin: This is is NOT required unless you are shipping your international orders using “Borderguru”
-
– IS Product Hazmat: This is Required, please select an option
-
– Safety Stock Qty: This is is NOT required unless you want the system to notify you when the inventory reaches a certain level. The default is 0 – which does not send any notification. If you want to get notification the number MUST be > than 0.
-
– Warehouse: Select the warehouse(s) you want to associate the item to
-
– Packing Supply: If this is checked, it means that it’s to be used in SMS settings for shipping packaging ONLY and it will be available in “Packaging SKU” on “Packaging Setting” under SMS. A secondary check box opens up which identifies is if owned by Deltafill. Leave uncheck if its client owned as its used for billing
-
– Raw Material: If its checked, it means that it will be used in Bill Of Materials section.
-
– Order Add-on Item: If its checked, the system will add this item to every order to be shipped. Thus, ONLY use it for generic product inserts that you want to be shipped with every order.
-
– Buy Plan Settings: The settings under this label controls the data displayed in the BUY Plan, here are the rules:
-
– All these settings are optional, but if the “Safety Stock (In Days/Month)” and “MF Lead & Transportation Time (in Days)” blank, that product will NOT be display the SKU on the Buy Plan
-
– Safety Stock (In Days/Month): this is days of stock you want to always keep
-
– MF Lead & Transportation Time (in Days): This is the number of days it takes for the items to be available for sale in the shipping warehouse
-
– Mode: This will be a drop down for “In-house” or “Outsourced”. The user can ONLY select one. You cannot create a WO for an “Outsourced” item.
-
– Factory: this will be a drop down from the “Warehouse View/Setup” page. There can ONLY be one Factory per product that manufacture the product. All raw materials need to be available in that factory for the WO to be created.
-
– Note the menus on the right side of the pop-up. Please go through them as some of them are required.
-
– Bill Of Materials: This is where you select a product, put the quantity needed then click on “Add” to create a list of BOM.
-
– Copy or Update to Channel Product: If this box is checked, it will create the product in “Channel Product” table under MMS (if the product is not already there) or Update its properties in the “Channel Product” table under MMS (if its available).
WMS
a.1 Configuration – Location
a.2 Configuration – Vendor
a.3 Configuration – Warehouse
b. Cycle Count Process
c. Inter Warehouse Transfer
d. Inventory Move Log
e. Inventory Product
f. Inventory Summary
g. PO Process
h. RMA Process
[Table of Contents]