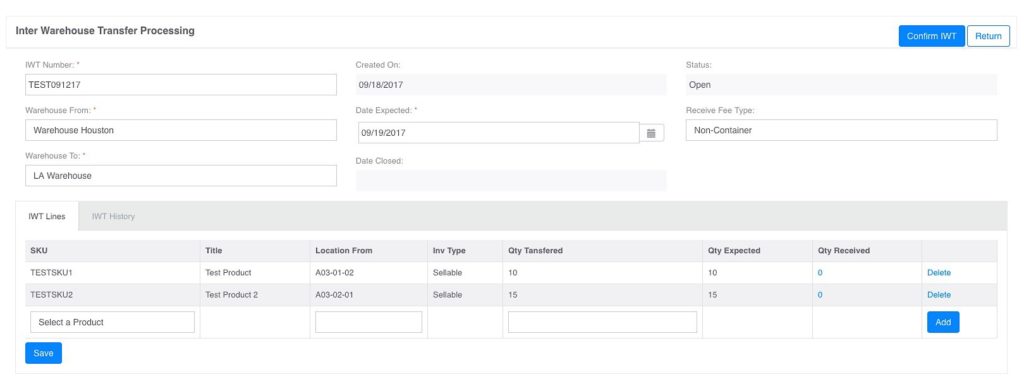
If you have inventory in one warehouse that is needed by another warehouse. You can use this menu to move the inventory from one warehouse to another. It will be similar to the PO creation, with one main difference as outlined below.

-
– IWT Number: click on the actual number to view the details on the transfer
-
–  This will open a new window for you to create a new Transfer as showed below:

-
– IWT Number: This your PO number which will be used to receive the products in the PO Process at the destination location
-
– Warehouse From: This is the location that the inventory is currently in
-
– Warehouse To: This is the destination location
-
– Date Expected: This is the tentative date that the product is expected at the destination location. Note that the date MUST be a future date
-
– Received Fee Type: This is drop down and you MUST select the delivery method to the destination location. Selecting the wrong method will result in an inaccurate invoicing.
-
– SKU: This is the Inventory item you want to transfer
-
– Location From: This is the location that the product(s) is stored in the “Warehouse From”. Depending on how many location(s) the item is/are stored, this will be a drop down.
-
– Qty Transferred: This will automatically display the quantity currently in the location, you can either transfer the entire amount or enter your desired quantity.
-
– Save: This will save the transfer and put the status as OPEN.
-
-Confirm IWT: Note, for the transfer to be received in the PO Process, you MUST click on the “Confirm IWT”, this act is irreversible and it will auto adjust the inventory out of the “Warehouse From” and a PO is auto created in the “Warehouse To”.
WMS
a.1 Configuration – Location
a.2 Configuration – Vendor
a.3 Configuration – Warehouse
b. Cycle Count Process
c. Inter Warehouse Transfer
d. Inventory Move Log
e. Inventory Product
f. Inventory Summary
g. PO Process
h. RMA Process
[Table of Contents]