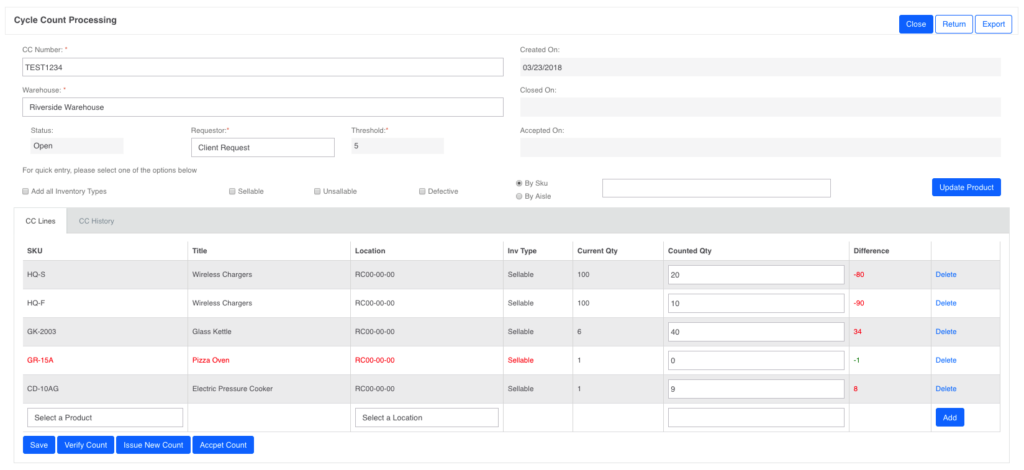
This is where cycle counts are created to reconcile inventory in a warehouse. This is the main page of the cycle count. Note that the system will log you out every 15mins unless you are on this screen which will auto log you out every 2hrs. So be sure to save you work or loose it all.

-
– Status: There are 3 main types of a Cycle count status and they are
-
OPEN: When a cycle count is entered, and save, the status remains in open state
-
ACCEPTED: This means that the user agrees to the cycle count numbers and approved the adjustments.
-
CLOSED: When a cycle count is closed
-
– CC Number: click on the actual number to view the details on the cycle count
-
–  This will open a new window for you to create a new Cycle Count as showed below:

-
– CC Number: Enter the cycle count number you want, duplicates are not allowed
-
– Warehouse: Select a warehouse you want to do cycle count on
-
– Requestor: This is the entity requesting the cycle count, select the appropriate requestor
DF Request: If this is selected, the cycle count will not be invoice
Client Request: If this is selected, the cycle count will be invoice
-
– Threshold: This will determine the acceptable level of difference(s) between the counted quantity and the available quantity.
-
– Select your desired “Inventory Type” you want to do cycle count on.
-
– By SKU: This is by default, you can either enter the specific SKU you want to count or you can leave it blank and click on “Update Product” to display the item(s) and locations within the warehouse. To add more than one SKU (Manually), you will need to “Save” and repeat the process again to add as many SKU(s) as you want.
-
– By AISLE: if you check this box, you will need to enter the Aisle you want to count. To add more than one Aisle, you will need to “Save” and repeat the process again to add as many aisle as you want.
-
– You can also use the “Select a Product” and “Select a Location” then “Add” to manually add the SKU’s and locations you want to count
-
– You can also Delete a line you don’t wish to count
-
– Export: You can export the cycle count into excel so you can do print it for counting
-
– Verify Count: This will ONLY appear when you click on “Save”. This should not be clicked until you key in the blind counts you did on the “Counted Qty” column. The functions below will appear when this button is clicked on
-
Current Qty: This will display the current quantity available in that location
-
Difference: This will compare the “Current Qty and the Counted Qty” and display the difference. Red means it’s different (< or >) and green means its correct.
-
Issue New Count: This will Duplicate the cycle count by adding”-1”, “-2” or “-3” depending on the number of times you created a new count. The Green are auto accepted and the new counts is issued ONLY for the ones in Red.
-
Accept Count: This will auto adjust the inventory in each location regardless of its color and this action is irreversible. Thus, click with care.
WMS
a.1 Configuration – Location
a.2 Configuration – Vendor
a.3 Configuration – Warehouse
b. Cycle Count Process
c. Inter Warehouse Transfer
d. Inventory Move Log
e. Inventory Product
f. Inventory Summary
g. PO Process
h. RMA Process
[Table of Contents]
